When we send a email with iPhone or iPad, the Mail APP will “cache” the email address to its database. When we start a new email, the auto-fill feature will pop up those cached email addresses. In most cases this feature is helpful, but sometime we may need remove some cached email addresses, or even disable this feature.
Before iOS 6, the only way to remove unwanted cached email addresses, is using iBackupBot to modify the backup of iPhone or iPad then restore to the device. For iOS 6 or later, if you want to batch remove email addresses (by default, iOS will cache up to 1000 email addresses), you can also use below steps:
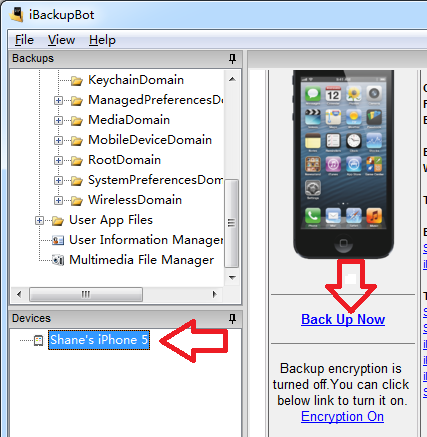
1. Backup your iPad or iPhone with iBackupBot:
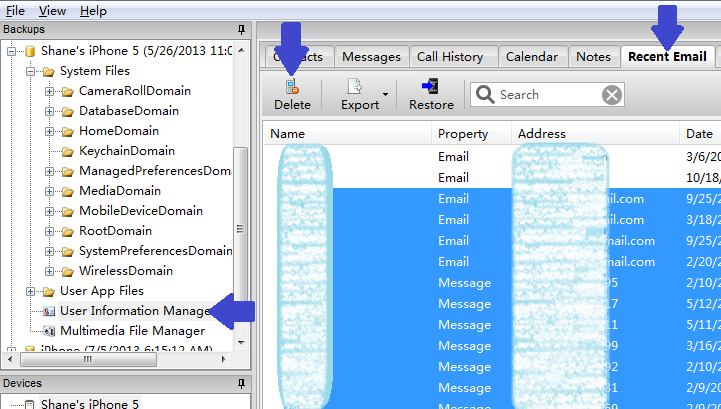
2. Select the backup just made, navigate to User Information Manager -> Recent Email, select email addresses that you want to delete then click Delete button on the toolbar (As the picture shows, iOS will also cache the destination of SMS messages):
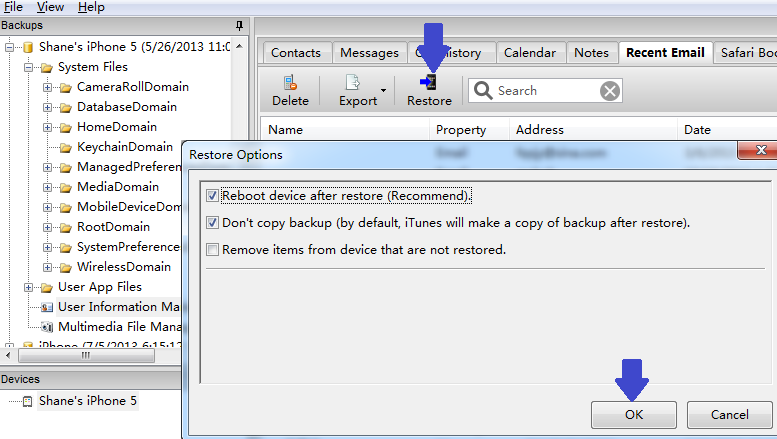
3. Click Restore button on the toolbar then click OK button, iBackupBot will restore the modified file to your device:
1. Backup your iPad or iPhone with iBackupBot, same as step 1 of delete email addresses.
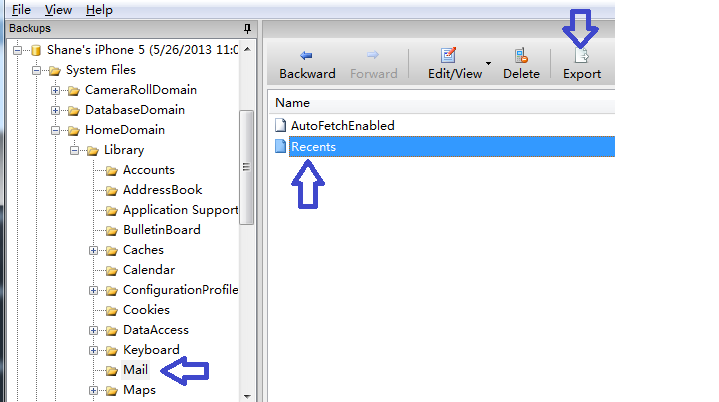
2. Select the backup just made, navigate to System File -> Home Domain -> Mail, select Recents in right side window, then click Export button on the toolbar, select the folder that include SQLite command-line shell program as destination folder:
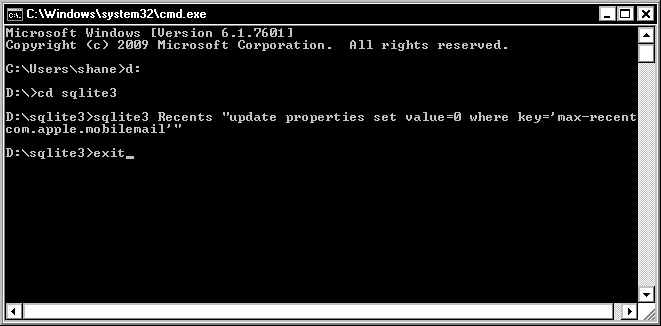
3. Open command prompt and go to the folder that include SQLite command-line shell program, then copy and paste below whole line of text to the command-line window then press Enter/Return key on the keyboard: sqlite3 Recents “update properties set value=0 where key=’max-recent:com.apple.mobilemail'”
Then you can enter exit and press Enter/Return key on the keyboard in the command-line window to exit command-line shell.
(For open command-line prompt on Windows computer For Mac computer, just click on your Applications folder inside of the hard drive then open the Utilities folder and double-click on Terminal)
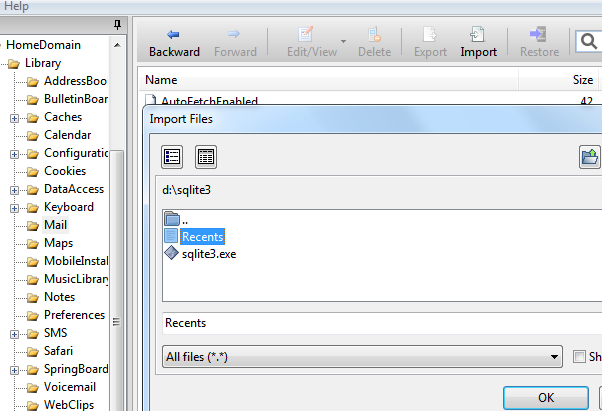
4. Switch back to iBackupBot, click Import button on the toolbar, select Recents file in the folder that include SQLite command-line shell program:
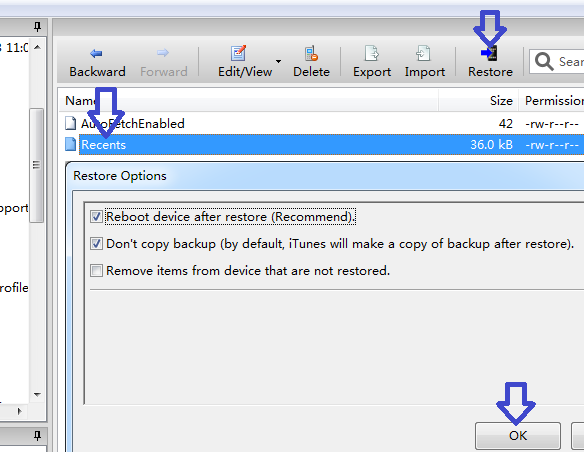
5. Select Recents in file list then Click Restore button on the toolbar to restore the modified file to your device:
After the restore processing done, your iPad or iPhone will restart, then it will not cache the email address anymore.
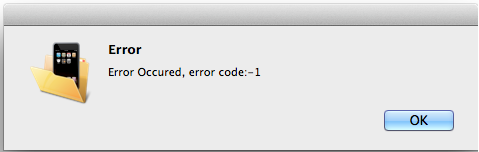
Sometime when restore a backup to iPad or iPhone with iBackupBot, iBackupBot may pop up a error message window show “Error occurred, error code: -1”, like this:
There are 3 cases can cause this problem:
Case 1. The most possible reason is that you enabled Find My iPhone on your iPad or iPhone, you can temporary disable it then try to restore again, and re-enable it after restore completed. To turn off Find My iPhone on an iOS device, tap Settings > iCloud, then tap to turn off Find My iPhone.
Case 2. Your iPad or iPhone is busy. E.g, you do a restore with iTunes and the restore processing is not completed, then you do a restore with iBackupBot, the error will occurred. Your can try to restore your iPad or iPhone two more times.
Case 3. If you try the method in case 1 and case 2 and the problem still not resolved, you can try restore your device with iTunes on a different known-good computer. If the errors persist on another computer, the device may need service, just take it to Apple Store.
Sometime you may want to know the battery charge cycle count of your iPad, iPhone or iPod Touch, so you can know whether the battery is healthy. Especially when you buy a iPad, iPhone or iPod Touch from others. It is impossible at before unless you jailbreak your iPad, iPhone or iPod Touch.
But now with iBackupBot 4.0 or later, you can check this very easily:
1. Connect your iPad, iPhone or iPod Touch to computer, then launch iBackupBot.
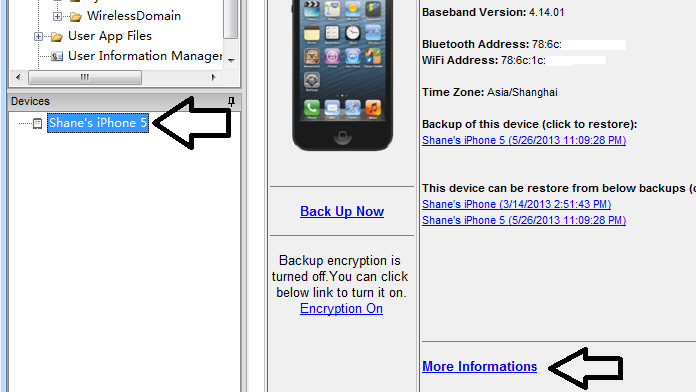
2. Select your iPad, iPhone or iPod Touch in Devices window, then click More Informations in right side window:
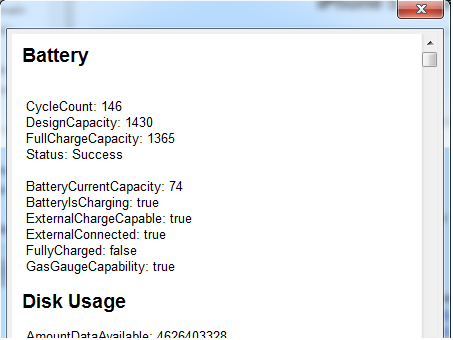
3. iBackupBot will pop up a window to show many informations about your iPad, iPhone or iPod Touch, include the battery charge cycle count, battery campacity and more:
Sometime when restore a backup to iPad, iPhone or iPod Touch by iBackupBot, an error may occurred, the error message shows by iBackupBot is Error Occurred, error code:-36. If try to restore the backup by iTunes, will get an error message iTunes could not restore the iPhone because not enough free space is available on the iPhone.
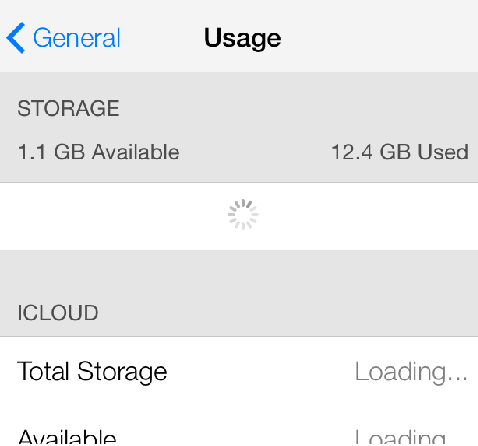
This error means that the free space on your iPad, iPhone or iPod Touch is less than the content size of the backup. We can check free space on device by launch the Settings app then choose the General tab then choose Usage, for example, as below picture shows, I have 1.1 GB free space on my iPhone:
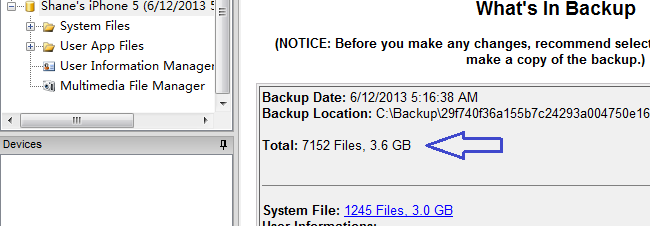
Then we can check the content size of backup that we want to restore by iBackupBot, select the backup in iBackupBot and check “What’s in Backup” section, as below picture shows, the contents size of the backup that I want to restore is 3.6 GB:
The free space on my iPhone (1.1 GB) is less than the content size of the backup (3.6 GB), if I restore this backup to my iPhone by iBackupBot, I will get error code -36, if I restore by iTunes, I will get iTunes could not restore the iPhone because not enough free space is available on the iPhone.
To resolve this problem, we have 2 ways:
1. Remove some contents on device that also exist in the backup, until the free space on device is less than the content size of the backup. For example, I have 2.9G files in Camera Roll, these files also exist in the backup, so I can remove these files from my iPhone, then the free space on my iPhone will be 4.0G, so I can restore the backup with no problem.
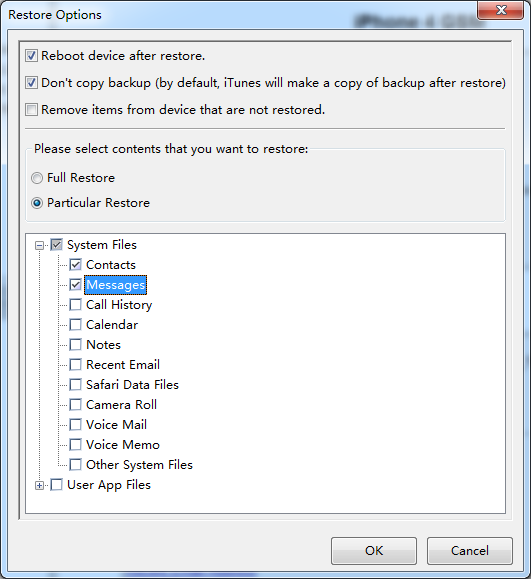
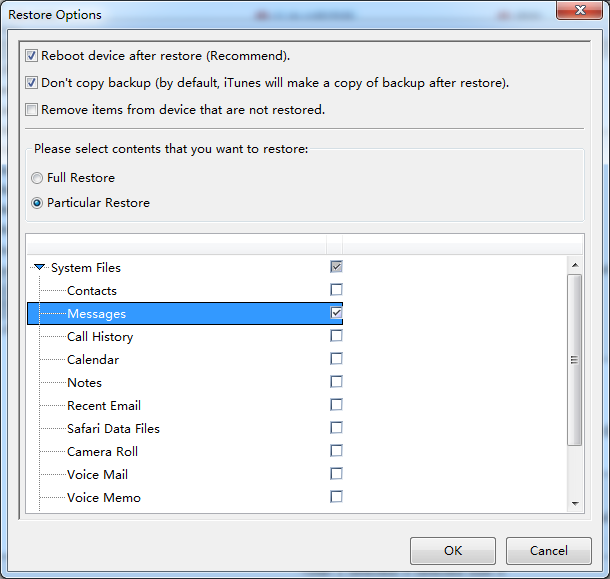
2. Do not do a full restore, only restore the contents that we want, for example, select Particular Restore in restore option window, then only check Contacts and Messages to only restore SMS messages and address book:
NOTICE: For some iOS version, do a particular restore may cause Camera Roll files remove from your device. So if Camera Roll files not exist in the backup, before you do particular restore we recommend you backup your device to another place: select the device in Devices window of iBackupBot, then click Back Up Now in right side window and select Back up to another folder in backup option window and click OK button.
Tags: Restore Error Posted in iTunes Backup Manager | Comments Off on Error code -36: iTunes could not restore the iPhone because not enough free space is available on the iPhone
With iBackupBot you can transfer voicemails from iPhone to PC and Mac computer very easily, no jailbreak required, with sender number and time stamp. Just backup your iPhone then use iBackupBot to export voicemails to PC and Mac computer, even the backup is encrypted with password.
Below is concrete steps:
1. Connect your iPhone to computer and run iBackupBot, while the iPhone’s name appears in Devices window of iBackupbot, select it and click Back Up Now in right side window. iBackupBot will let you select back up to iTunes default backup folder of back up to another folder, the first choice will overwrite the exist backup of this iPhone; With the second choice you can select an empty folder to make a new backup.
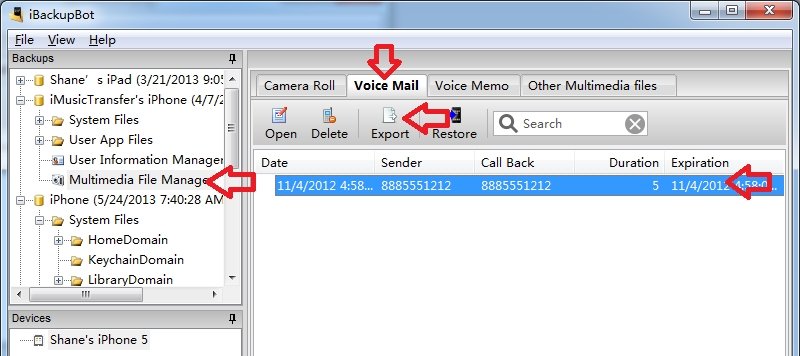
2. After the backup processing done, expand the backup you just made in Backups window of iBackupBot, then select Media File Manager, switch to Voice Mail tab, select voicemails that you want to transfer and click Export button.
iBackupBot will put the sender number and time stamp in exported file’s name, looks like below:
You can play the file with QuickTime or other media player that can play .amr file.
Today, we are excited to announce iBackupBot for Windows & Mac v4.0.0.
The new version contains many new features, include:
New user interface, more user friendly.
Browse files by folder.
Browse, view and export file from a password protected backup. If a backup is encrypted and you remember the password, now you can deal with it with iBackupBot.
View contacts more detail, and export to VCARD file.
View SMS/MMS/iMessage more detail, and export to HTML file.
View Calendar, and export to ICAL file.
Export iPhone Voicemail with sender number and timestamp.
After downloaded, if you launch the package file directly, Mountain Lion will pop up a window and tell you “iCopyBot_for_Mac.pkg(/iBackupBot_for_Mac.pkg) can’t be opened because it is from an unidentified developer” and you can’t install iCopyBot or iBackupBot.
How to install iCopyBot and iBackupBot on Mountain Lion?
Answer:
After downloaded the package file, hold “control” button and click (or just right-click) the package file, then select “Open” from pop up menu, Mountain Lion will prompt you “iCopyBot_for_Mac.pkg (/iBackupBot_for_Mac.pkg) is from an unidentified developer. Are you sure you want to open it?”, just click “Open” button to install it.
If you are using iBackupBot v4.0 or higher, you can transfer SMS messages from one iPhone to another iPhone very easy.
1. Connect source iPhone to computer, run iBackupBot and select the iPhone in left side window, then click Back Up in right window. You can also back it up with iTunes: click the iPhone’s name in iTunes then click Back Up Now button.
2. After the backup processing done, connect the destination iPhone to computer, then you have two choice:
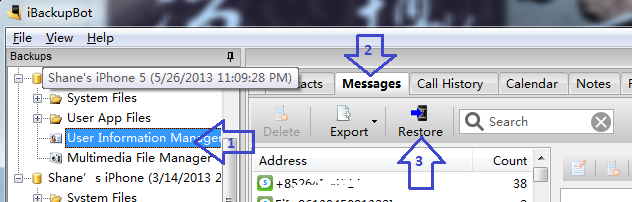
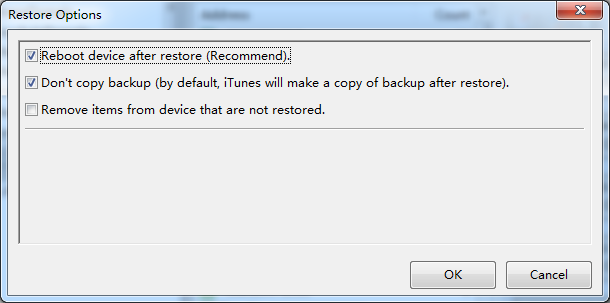
First choice: Navigate to backup of source iPhone->User Information Manager->Messages, then click the Restore button in toolbar of message view window, then keep the default settings in restore option window and click OK button:
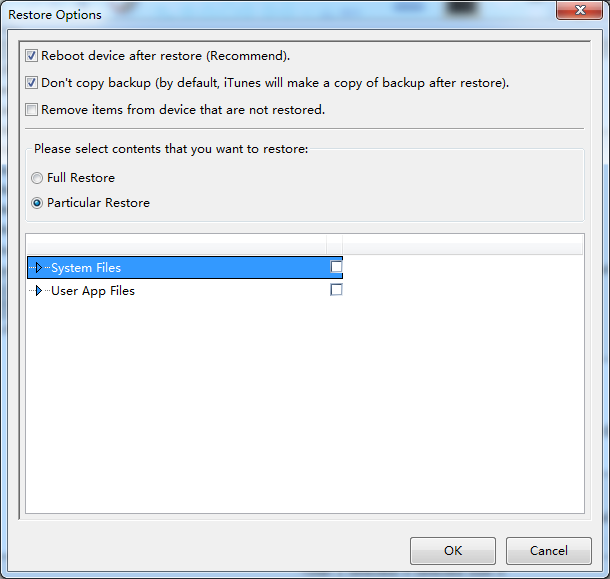
Second choice: select the backup of source iPhone, then select File->Restore from main menu, uncheck System Files and User APP Files in restore option window, then check Messages under System Files and click OK button:
That’s all. After the restore processing done, your iPhone will restart automatically, then you can check SMS messages on the destination iPhone.
If you are using iBackupBot 3.x or before, please follow below steps:
1. Backup the source iPhone in iTunes: run iTunes, connect the iPhone to computer, when the iPhone appears under Devices in your iTunes sidebar, Right -Click it (Windows) / Control-click it (Mac) and select the Back Up option.
2. Backup the destination iPhone: disconnect source iPhone, connect destination iPhone to computer, when the iPhone appears under Devices in your iTunes sidebar, Right -Click it (Windows) / Control-click it (Mac) and select the Back Up option.
3. Run iBackupBot, select the backup of source iPhone in sidebar, then click the checkbox before /Library/SMS/sms.db in right side window.
4. Press CTRL+E (Windows) / ⌘E (Mac) and select “Export only checked file(s).” option, then check “Export with backup information, for import to another backup.” option, and press OK button, select a folder exist on your computer.
5. Select the backup of destination iPhone in iBackupBot sidebar, then press CTRL+I (Windows) / ⌘I (Mac), select the exported file in step 4.
6. Press CTRL+R (Windows) / ⌘R (Mac) to restore modified backup to destination iPhone.
Then you can wait, after the restore processing done, your iPhone will restart automatically.
Notice: this not works for iPad 1 with iOS 5.x, if you like multi-touch gestures feature, I recommend you don’t upgrade your iPad 1 to iOS 5.
We can find some guide on the Internet that show how to enable multi-touch gestures on iPad, but all of them request your iPad is jailbreaked, or need you own a Mac computer with XCode installed.
Now with iBackupBot, we can easily enable multi-touch gestures on iPad without jailbreaking:
What you need:
1. A PC computer with Windows XP/Vista/7 system, iTunes 10.2.1 installed.
1. Run iTunes, connect your iPad to computer, right click your iPad name in left window of iTunes and select Back Up.
2. After the backup process done, exit iTunes, run iBackupBot, select the newest backup of your iPad in left window of iBackupBot.
3. Double click Library/Preferences/com.apple.springboard.plist in right window of iBackupBot, it will pop up a plist editor window.
4. Add below two line under <dict> line: <key>SBUseSystemGestures</key>
<true/>
5. Click the Disk button to save changes then close the plist editor window.
Notice: When saving changes, the program will re-sort the contents of plist file by key, so the 2 lines you just added may been moved to other place, you can press CTRL+F and enter SBUseSystemGestures to find it.
6. Press CTRL+T, the program will prompt “Do you really want restore this backup to your device?”, just click Yes button.
7. After the restore process done, your iPad will restart automatically, then you can enjoy the multi-touch gestures feature.
BTW: this method will not show the multi-touch gestures switch in option window of iPad, so if you want disable multi-touch gestures feature, you can find and delete the two line that you added in Library/Preferences/com.apple.springboard.plist then restore to iPad using iBackupBot.
1. Play The Sims 3 on your iPhone, remember how many money you own in the game, then exit the game.
As the picture shows, I have $690 in the game.
2. Run iTunes, connect your iPhone to computer, right click your iPhone name in left pane of iTunes then select Back Up from pop up menu.
3. After backup process done, close iTunes and run iBackupBot, expand your iPhone’s backup name in left pane and select The Sims 3, then double click Documents/sim3dat0 in right pane.
4. The program will pop up a HEX Editor window, press CTRL+G, enter 2Bh and press OK button, the word value show in bottom of the windows should be your money amount in the game.
5. Enter FFFF then press CTRL+S to save the change, then close HEX Editor window.
6. Press CTRL+T to restore changed backup to your iPhone, after the restore process done, your iPhone will restart automatically, then you can run The Sims 3 on your iPhone and check how many money you have.