Archive for the ‘iPod to Computer Transfer’ Category
Saturday, November 30th, 2013
UPDATE you may interesting: Merge SMS/iMessage messages with attachments from old iPhone to new iPhone
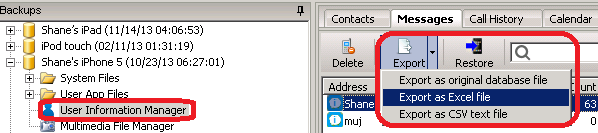
With iBackupBot, you can easily transfer SMS (regular text message), MMS (message with multimedia attachments) and iMessages from your iPhone to Mac and PC computer.
You can export all SMS, MMS and iMessages to a SQLite database file, or to a EXCEL file, or to a CSV text file:
- 1.Backup your iPhone with iBackupBot or iTunes.
- 2.Select the backup in iBackupBot, navigate to User Information Manager, then switch to Messages tab in right side window.
- 3.Click the drop-down button on the right side of Export button to select export file format and name the export file:
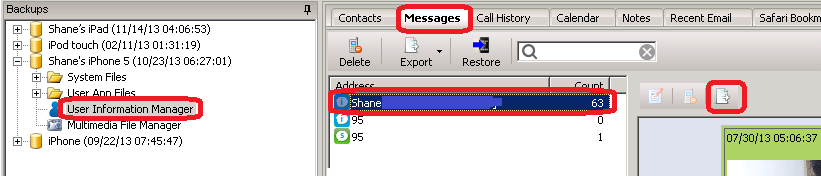
You can also export a chat (all SMS, MMS and iMessages with someone) to a HTML file with photo, video attachments:
- 1.Backup your iPhone with iBackupBot or iTunes.
- 2.Select the backup in iBackupBot, navigate to User Information Manager, then switch to Messages tab in right side window.
- 3.Select the chat that you want to export, then click the Export button on toolbar of chat window and name the export HTML file:
Tags: iMessage, SMS
Posted in iPod to Computer Transfer, iTunes Backup Manager | Comments Off on Transfer SMS, MMS & iMessages from iPhone to Mac & PC
Monday, August 20th, 2012
First, download the installation package file from:
http://www.icopybot.com/download.htm
After downloaded, if you launch the package file directly, Mountain Lion will pop up a window and tell you “iCopyBot_for_Mac.pkg(/iBackupBot_for_Mac.pkg) can’t be opened because it is from an unidentified developer” and you can’t install iCopyBot or iBackupBot.
How to install iCopyBot and iBackupBot on Mountain Lion?
Answer:
After downloaded the package file, hold “control” button and click (or just right-click) the package file, then select “Open” from pop up menu, Mountain Lion will prompt you “iCopyBot_for_Mac.pkg (/iBackupBot_for_Mac.pkg) is from an unidentified developer. Are you sure you want to open it?”, just click “Open” button to install it.
Tags: iPod to Computer Transfer, iTunes Backup Manager
Posted in iPod to Computer Transfer, iTunes Backup Manager | Comments Off on How to install iCopyBot & iBackupBot on Mountain Lion
Thursday, March 10th, 2011
Some iCopyBot user asked: “I plug my iPod into the computer and iCopyBot shows the contents of my iPod, but then iTunes opens and eject my iPod so iCopyBot no longer shows the contents of my iPod. How do I prevent iTunes from starting when iPod is plugged in?”
As we know we can uncheck the “Open iTunes when this iPod is connected” option in iTunes, but when we apply the change iTunes will ask us to sync iPod with iTunes library, we may lost all music on iPod before transfer to iTunes by iCopyBot. Is there other choice?
The answer for Windows computer:
iTunesHelper.exe is a service used by iTunes to determine when an iPod is plugged in, so it can launch iTunes automatically. So we can temporary stop this service to stop iTunes starting automatically: just press Ctrl+Alt+Delete to launch Windows Task Manager, switch to Processes tab and look for iTunesHelper.exe, select it then click End Process button.
The answer for Mac computer:
Click the Apple logo on top-left of screen and select System Preferences then open Accounts, switch to Login Items and uncheck the “iTunesHelper” item, then restart your computer.
Now you can run iCopyBot and connect your iPod to computer, then press “Copy to iTunes” button to transfer music from your iPod back to iTunes library.
Tags: iPod to iTunes
Posted in iPod to Computer Transfer | Comments Off on Stop iTunes from opening when connect iPod to computer
Saturday, October 2nd, 2010
Now with iCopyBot iPod to Computer Transfer v6.1.1 or later, you can export playlist on your iPad, iPod or iPhone to M3U or M3U8 file directly.
What is M3U and M3U8?
M3U is a computer file format that stores multimedia playlists. It supported by many multimedia applications. M3U8 is unicode version of M3U.
How to export iPad, iPod, iPhone playlist to M3U or M3U8?
First, please download and install iCopyBot from our iPod software download page, launch iCopyBot and connect your iPad, iPod or iPhone to computer, check the playlists and its songs that you want to export, then press Copy to Folder button. The program will show you an export option window, you can change target folder and target folder structure, file naming rule here, then check Export playlist as .M3U playlist file option and press OK button to start export process. If you want export to M3U8 format, please also check Use unicode version of M3U (.M3U8) option.

By default, the M3U file is placed in the same folder as the multimedia file, and directories must be preserved when moving the m3u file to another device if sub-folders are used. This method is more compatible as it doesn’t rely on the file path staying the same. If you want move m3u file freely and leave multimedia file in a fixed place, you can check the Use absolute path option to make it store absolute path of multimedia file into m3u file.
Other new feature in iCopyBot v 6.1.1
Now you can select a new folder structure: Group by Playlist, the program will create a folder for each playlist on your iPad, iPod or iPhone and store the songs, videos in the playlist to this folder.

iCopyBot v6.1.1 also fixed a bug when deal with duplicated files automatically.
Special thanks to Marc van de Laar, thanks for your great suggestions!
Tags: Export iPod Playlist
Posted in iPod to Computer Transfer | Comments Off on Export iPad, iPod, iPhone Playlist to M3U or M3U8
Tuesday, August 11th, 2009
Before transfer, I have an empty iTunes library:

Now, exit iTunes and run iPod to Computer Transfer, connec iPod Nano to computer, the contents of iPod Nano will show in iPod to Computer Transfer, check songs that want to copy:

Then press Copy to iTunes button, when it prompt target folder, just click OK. When transfer processing done, it will prompt you:

Now we can exit iPod to Computer Transfer and run iTunes, we will see the songs already transfer to iTunes (By default, iTunes will show songs by album, for list every songs, please select main menu->View->As list):

Tags: iPod Nano to iTunes
Posted in iPod to Computer Transfer | 1 Comment »
Tuesday, August 4th, 2009
If there are more than one iPod in your family, for example, you have an iPod Mini and like classic music, your son have an iPod Shuffle and like pop music, you can make two iTunes library on your computer, one for you and another on for your son. For create secondary iTunes library, please follow below steps:
Step 1. If iTunes is running, exit it.
Step 2. Hold down the Shift key then click iTunes’s icon to start it, until this dialog appears:

Step3. Now you can release the Shift button. Click Create Library button in the popup dialog, and enter a library name, like iTunes 1, then press OK button.
Now iTunes will open with a brand new library, you can add music, video and apps to the library and sync to iPod.
To switch between multiple iTunes library, just hold down Shift key when start iTunes, then click Choose Library button from popup dialog.
From iPod to Computer Transfer v 4.8, it support multiple iTunes library, just swith to the right Library with iTunes before your transfer music from iPod to iTunes.
Tags: iTunes Library
Posted in iPod to Computer Transfer | Comments Off on iPod to Computer Transfer & Multiple iTunes Library
Sunday, May 31st, 2009
For some model of iPods, like iPod Shuffle, iPod Mini, iPod Nano and so on, we can switch to “Disk Use” mode to turn it into a harddriver, then get songs off iPod (not the best way, we will talk about it later). But for iPod Touch (someone call it iTouch, but a lot of iPod funs hate to call it iTouch) and iPhone, have no “Disk Use” mode, then, how to get music off iPod Touch or iPhone?
Here I list three ways to get music off iPod Touch (also works for iPhone and iPhone 3G):
First way, also the most easy way, is using our program iPod to iTunes Transfer.
- 1. Download and install iPod to iTunes Transfer.
- 2. run it and connect your iPod Touch (or iPhone / iPhone 3G) to computer, the program will list all contents of you iPod Touch.
- 3. click “Copy to Folder” or “Copy to iTunes” button and waitting for all things done!
Good:
- Easy to use.
- Safety, it will auto disable iTunes to sync your iPod Touch, so you not to afraid to lost your music.
- Not only get music, but also videos and pictures, and the filename are in organized.
- Not only get files off iPod Touch, can also transfer playlists back to your iTunes library!
Bad:
- Only works unser Windows system now, can not run on Mac OS.
- You have to pay US$19.95 for it.
Second way, is use a free program called iphonebrowser.
- 1. Download and install Self-extracting Installation.
- 2. Connect your iPod Touch to computer, if iTunes starts you must hold down both the Shift + Ctrl keys to prevent iTunes from auto-syncing with your iPod. If you don’t do so, iTunes may automatically erase the contents of your iPod.
- 3. Launch iphonebrowser and navigate to “iTunes_Control/Music” then right click the Music folder and select “Save Folder In”, then specify a target directory.
Good:
- Easy to use too, but look not so better.
- Free!
Bad:
- Not so safety, you must disable iTunes to sync your iPod manually.
- The copyed files name should be asd234.mp3 and such things.
- Can only copy the music files.
Thrid way, the most powerful way, also the most complex way, the most danger way, yes, it is “jailbreak” your iPod Touch or iPhone. Many information on the Internet, I do not want talk it more detail, just Google it.
Tags: iPod Software
Posted in iPod to Computer Transfer | Comments Off on How to get my music off my iPod Touch?
Tuesday, March 3rd, 2009
By default, when you transferring photos from computer to your iPod via iTunes, iTunes will optimize your photos while it sync to the iPod. This optimization results in a copy of the photo that is of less size and less quality than the original. So when you transferring photos from iPod back to computer, you will get small size photos.
To bypass this process and keep the quality and resolution of your photos, do the following steps:
1. Run iTunes and connect iPod to your computer.
2. Select the iPod in the iTunes Source list, confirm your iPod set to “Disk use” mode. (because iPod Touch and iPhone can not set to this mode, so this method will not working for iPod Touch and iPhone ).
 Transfer full size photos - 1 3. Select the “Photos” tab in iTunes and check the “Include full-resolution photos” checkbox.
 Transfer iPod full size photos - 2 Done!
Tags: iPod Software
Posted in iPod to Computer Transfer | Comments Off on Transfer original size photos between iPod and PC computer
Thursday, January 8th, 2009
If you have more than one iPods and want each iPod have different content, the only way that I found is managing your iPod content manually:
Step 1: Run iTunes, select main menu->Edit->Preferences, switch to Device tab, check Disable automatic syncing for iPhones and iPods.
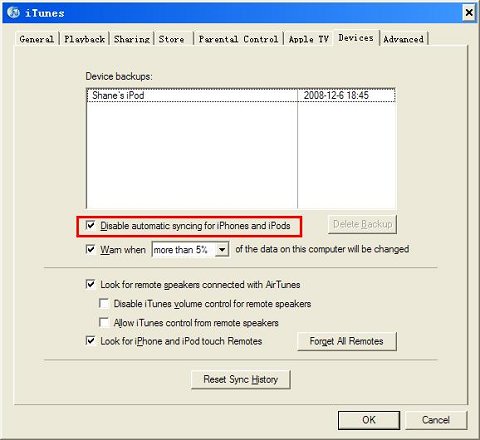
Step 2: Connect one of your iPod or iPhone to computer, select iPod or iPhone in the iTunes’s Devices list, check Manually manage music and videos and press Apply button.
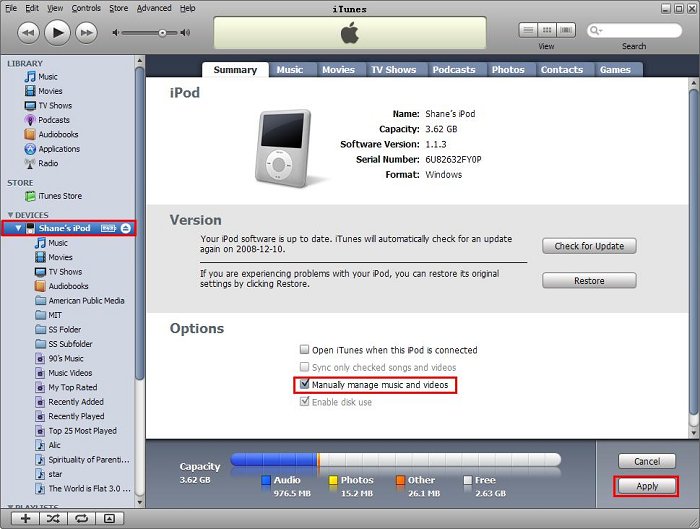
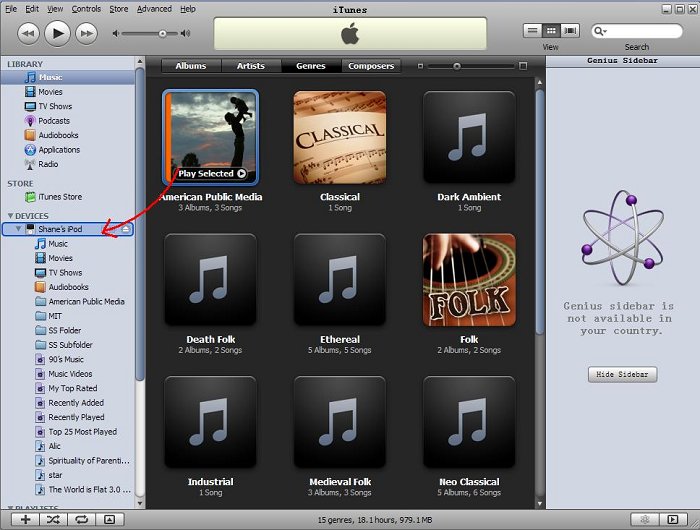
Step 3: Now you can managing your iPod and iPhone content manually. For add songs, videos, and playlists from iTunes to your iPod or iPhone, just drag the item to the iPod or iPhone icon in the Devices list on the left-hand side of the iTunes Window:
Repeat step 2 and step 3 for your other iPod or iPhone.
Tags: iPod Software
Posted in iPod to Computer Transfer | 1 Comment »
|