Archive for the ‘iTunes Backup Manager’ Category
Monday, December 28th, 2015
With iBackupBot you can edit a plist file in backup of iPhone, iPad and iPod Touch directly, under both Windows and OSX system.
Find out the plist file that you want to edit in backup browser or device browser of iBackupBot, then double click it or select it and press Enter key, the plist Editor window will pop up:
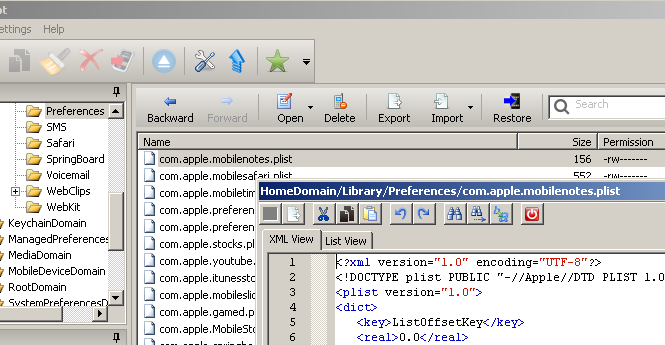
There are 3 parts on plist Editor window:
1.Toolbar. Include 11 buttons on it, from left to right are:
- Save – Save changed. When open a plist file this button is gray out, if you made some changes this button is enabled and you can click this button to save changes.
- Export – Export this plist file to a folder on your computer.
- Cut – Cut the selection and put it the clipboard. Only works in XML view mode.
- Copy – Copy the selection and put it the clipboard. Only works in XML view mode.
- Paste – Insert clipboard contents. Only works in XML view mode.
- Undo – Undo changes. Only works in XML view mode.
- Redo – Redo changes. Only works in XML view mode.
- Find – Find text in plist file. When click it a window will pop up and you can enter the text that you want to search:
- Find Next – Find next.
- Replace – Replace text in plist file. When click it a window will pop up and you can enter the text that you want to replace and the new text. Only works in XML view mode.
- Close – Close plist Editor window. If you changed the file and not saved, it will prompt you whether to save changes.
2.View mode select tab.
You can select XML view mode and List view mode.
3.plist file contents window.
XML view mode – In this mode, the plist file shows as a text file in XML format. You can make any change you want as edit a text file, the premise is that you know the abcs of XML format and plist format.
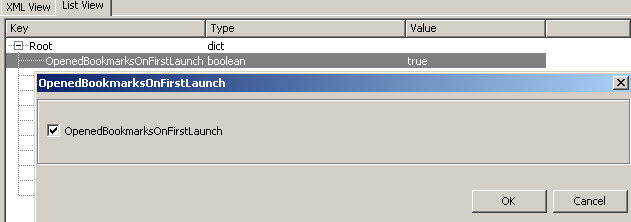
List view mode – In this mode, the plist file will show in a very understandable tree list view. You can understand the contents in the plist file easily and quickly, and you can change the value of a single item with boolean, date, data, integer, real and string type. Currently you can’t add or remove items, but we will support it in future release.
For change the value of an item, just double click it or select it then press Enter key, a new window will pop up and you can change value in this window. For different data type, the window also looks different:
- boolean – a window with a check box item will pop up, you can click the check box or press space bar to change the value then press OK button to confirm the change.
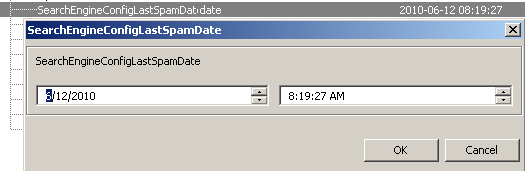
- date – a window with a date input item and time input item will pop up, you can change the value and press OK button to confirm the change. The date value in plist file is store in UTC format, when show in list view mode, iBackupBot will convert it to your local time zone, when save changes iBackupBot will convert it back to UTC format automaticaly and store to plist file.
- data – iBackupBot will analyst the data content, then pop up a window according to the content: if it is a plist then pop up a new plist Editor window, if it is a picture then pop up a picture viewer, if it is normal text then pop up a text editor, otherwise will pop up a hex editor.

- integer, real and string – a window with a text input item will pop up, you can change the contents and press OK button to confirm the change. For integer and real value iBackupBot will check whether your input is valid when you click OK button.

Tags: plist Editor
Posted in iTunes Backup Manager | Comments Off on Edit plist files in backup of iPhone, iPad and iPod Touch
Thursday, December 24th, 2015
If you got error code 20 when restore a backup to iPhone, iPad or iPod Touch with iBackupBot or iTunes, it means that the restore process can’t communicate with Apple server or resources on your computer, it may cause of one of below cases:
1. Third party programs, esp. anti-virus software and firewall software, prevent the restore process communicate with Apple server or resources on your computer.
For this case, you can follow below article from Apple to try to resolve it:
Resolve issues between iTunes and third-party security software
2. Your data cable, USB port on computer or network have some problems, you can try to restore your iOS device two more times while connected with a cable, USB port, computer, and network you know are good.
3. Some of your backup files are damaged and some important contents are missing or your device have some software issue, you can try to enable the Transfer system log to computer automatically option iBackupBot then restore again, then view the system log file with text viewer and try to find out the problem, notice the BackupAgent error in system log file.
4. You jailbreak your device and the jailbreak process is incorrect.
If you tried all above steps and can’t resolve the problem, please try to contact Apple support, your device may have hardware issue.
Tags: Restore Error
Posted in iTunes Backup Manager | Comments Off on Error code 20 when restore to iPhone with iBackupBot or iTunes
Tuesday, December 22nd, 2015
iOS devices (iPhone, iPad, iPod Touch) have a system log like other UNIX-derived operating systems do. The system log can be helpful for developers, also helpful for us to find out the reason of some backup/restore problems.
With iBackupBot you can transfer system log from iOS devices to computer easily, no need jailbreak your device.
Transfer system log to computer manually
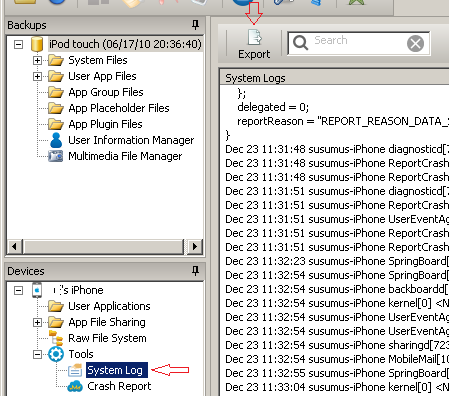
1. Launch iBackupBot and connect your iPhone/iPad/iPod Touch to computer.
2. When your device appears in Devices window of iBackupBot, select Tools->System Log under your device’s name.
3. Click Export button on tool bar of system log window to transfer it to computer when need.
This method if useful for debug Apps or find out backup problem. But if you want to find out restore problems, this method may not works, because after restore the device will restart automatically and will disappear in iBackupBot so you have no chance to click Export button. In this case you can use below method.
Transfer system log to computer automatically
1. Select View->Options from main menu of iBackupBot, select a folder to store system log files on System Log Folder option, the folder must be already exists on your computer. (If you want disable transfer system log automatically, just change this option to blank).
2. Connect your device to computer, when it appears in Devices window of iBackupBot, select Tools->System Log under your device’s name, iBackupBot will create a new log file ( the file name is your device’s name + the time that start transfer) in the folder that you selected in step 1 and transfer system log to it automatically, until the device disconnect from computer or you close iBackupBot.
Tags: iPhone system log
Posted in iTunes Backup Manager | Comments Off on Transfer system log from iPhone to computer
Monday, September 22nd, 2014
When you got a new iPhone, you may want merge some important messages from your old iPhone to new iPhone. Now with iBackupBot 5.2.2 or later, you can merge SMS/iMessage messages with attachments very easily.
The source backup and target backup can made by different iOS version, source backup can made by iOS 3 ~ iOS9, target backup can made by iOS 6 ~ iOS 9.
The steps:
- 1. Backup your old iPhone, if you already had a backup of old iPhone, you can skip this step.
- 2. Backup your new iPhone.
You can do these 2 steps with iTunes: just connect iPhone to computer and run iTunes, select the iPhone in iTunes and click Back Up Now button. You can also do these 2 steps with iBackupBot.
Then, before start below steps, we recommend you make a copy of the backup of your new iPhone, so if you no satisfied with result, you can go back to this backup: just launch iBackupBot, select the backup of your new iPhone, then select File -> Duplicate from main menu.
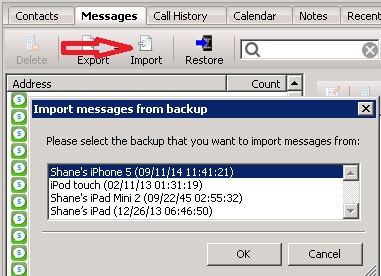
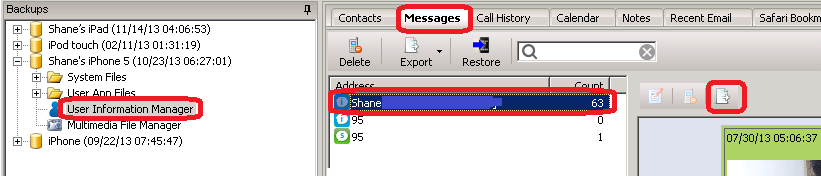
- 3. Expand the backup of new iPhone in iBackupBot, select User Information Manager, then switch to Messages tab in right side window, and click the Import button, if you have more than one other backups, iBackupBot will prompt you select a backup to import messages from:
- 4. iBackupBot will pop up a message select window, you can select the messages and attachments that you want import here, you can use sort, multiple select, context menu here:
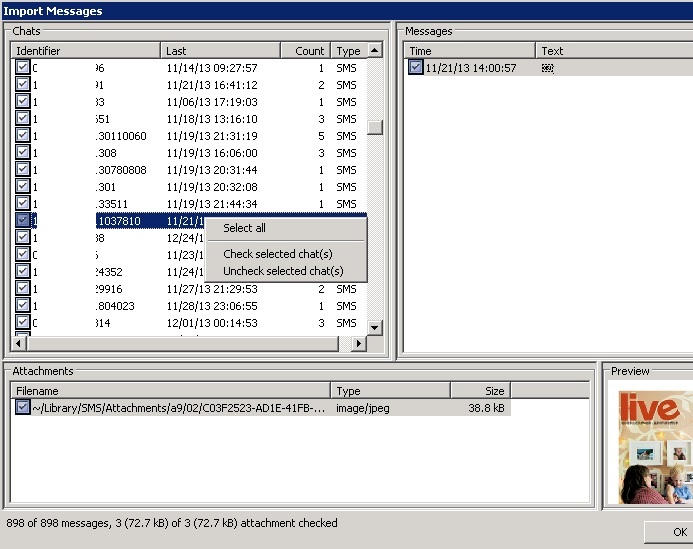
No need warry about duplicate messages, iBackupBot will filter out duplicate messages automatically when importing.
After all messages and attachments that you want merge are checked, click OK button.
- 5. Now we can prepare to restore the backup to iPhone: First, please turn off Find My iPhone on your new iPhone, just tap Settings > iCloud, then tap to turn off Find My iPhone, you can turn it on after restore.
Second, please close the Message App on iPhone, about how to close an App please read this.
- 6. Select the backup’s name of new iPhone in iBackupBot, then select File -> Restore from main menu, keep the Remove items that not restored option checked and click OK button:
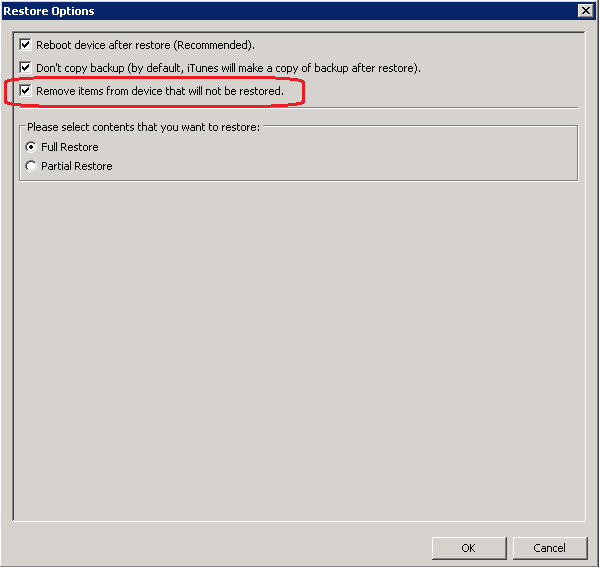
Then just waiting for the restore processing done.
The feature for merge contacts coming soon!
Posted in iTunes Backup Manager | Comments Off on Merge SMS/iMessage messages with attachments from old iPhone to new iPhone
Thursday, March 13th, 2014
The error code 103 & 205 may cause of below cases:
1. You iPad, iPhone or iPod Touch is locked by passcode, please unlock your device and try to restore again.
2. Cause of some security software on your computer, please try to add iBackupBot to the white-list of your security software.
If it still not works, please try to let iBackupBot use iTunes’s restore engine:
Select View->Options from main menu of iBackupBot, then select “iTunes Restore Engine” and click OK button, then try to restore again.
Tags: Restore Error
Posted in iTunes Backup Manager | Comments Off on Error code 103 & 205 when restore to iPad or iPhone with iBackupBot
Tuesday, March 4th, 2014
After a period of use of your iPad, iPhone and iPod Touch, your device may full of junk files: you remove a SMS/MMS message but some attachments not been removed, you remove a photo from Camera roll but some thumbnails not been removed, and many App caches, iOS system caches, temporary files, etc. Especially when you device upgrade from old iOS to new iOS, may generate many junk files on your device. These files will eating many space of your iPad, iPhone and iPod Touch, and making it work slower.
Now with iBackupBot v5.1.5 or later, you can clean up these junk files with just few clicks, no jailbreak request. If your device is slow down or got the “not enough local storage to install apps” error when install or update an App, please try to use iBackupBot to clean up your device.
First, you can remember the free space of your device in iTunes or on your device, for compare after clean up. below is mine:

Then you can follow below steps:
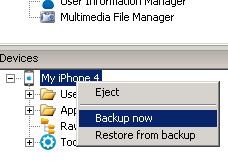
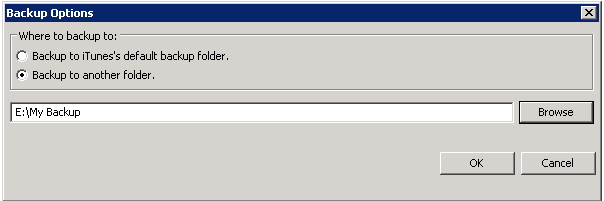
- 1.Launch iBackupBot, connect your iPad, iPhone or iPod Touch to computer, and backup it with iBackupBot:
We recommend you create a new folder on your computer and backup your device to this folder:
After the backup processing done, iBackupBot will load it into backup list, we recommend you right click on the backup and select Duplicate to make a copy of the backup to another folder, so if you not satisfy with the clean up result, you can go back to this backup.
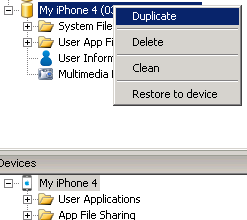
- 2.Right click the backup and select Clean, or select the backup then select File->Clean or click the Clean button on the toolbar, iBackupBot will analyst the backup then show below window:
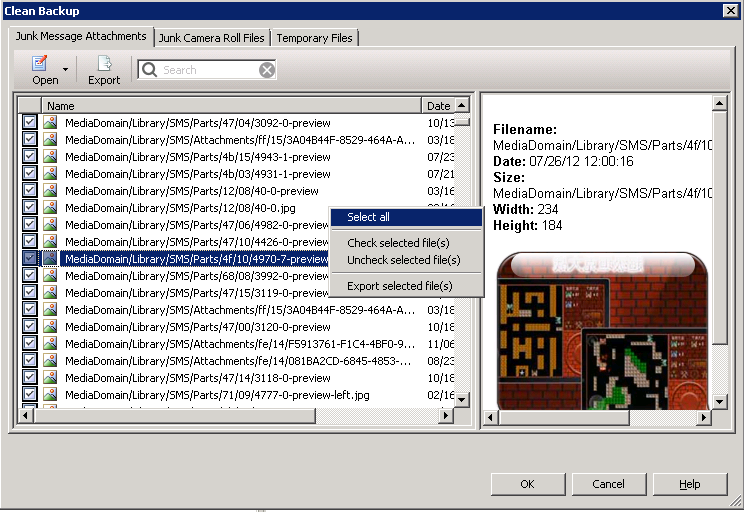
- The Junk Message Attachments tab list all attachments and its thumbnails that the recorder it belong to already removed from SMS/MMS/iMessage database, you can right click and select Select All then click Export button to export these files to a folder on your computer, so you can keep some attachment files that you want.
- The Junk Camera Roll Files tab list all photos and thumbnails that the recorder it belong to already removed from camera roll database, you can also export them to computer before clean up them from the backup.
- The Temporary Files tab like below:

- The Camera Roll Thumbnails option: recommend, check this option will remove all camera thumbnails and let your device rebuild all thumbnails.
- The Web App Cache option: not recommend, clean up caches with all Web base apps.
- The Passes Caches option: recommend, clean up caches of Passes App.
- The Cookies option: not recommend, clean up App cookies. If you want keep App status don’t check this option.
- The SMS Drafts option: recommend, clean up drafts of SMS/MMS/iMessages.
- The Location Cache option: not recommend, clean up all information and settings of Location service. check this option will disable location service for all Apps, you have to enable it on device one by one.
- 3.Now you can click the OK button to let iBackupBot start clean up the backup. After the clean up processing done, right click on the backup and select Restore or select File->Restore from main menu or click the Restore button on the toolbar, confirm you checked the Remove items that not restored option:
Then click OK button to start restore. (before start restore, please confirm the Find my iPhone feature is off, to turn off Find My iPhone on an iOS device, tap Settings > iCloud, then tap to turn off Find My iPhone.)
- 4.Enjoy the result. below is mine:

As the picture shows I got 0.85Gb (850Mb) free space. If you haven’t clean up your iPad, iPhone or iPod Touch for a very long time, you can get more free space.
Posted in iTunes Backup Manager | Comments Off on Clean up iphone junk files: SMS message attachments, camera roll photos and caches
Saturday, November 30th, 2013
UPDATE you may interesting: Merge SMS/iMessage messages with attachments from old iPhone to new iPhone
With iBackupBot, you can easily transfer SMS (regular text message), MMS (message with multimedia attachments) and iMessages from your iPhone to Mac and PC computer.
You can export all SMS, MMS and iMessages to a SQLite database file, or to a EXCEL file, or to a CSV text file:
- 1.Backup your iPhone with iBackupBot or iTunes.
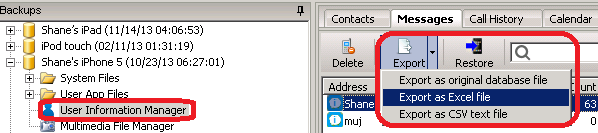
- 2.Select the backup in iBackupBot, navigate to User Information Manager, then switch to Messages tab in right side window.
- 3.Click the drop-down button on the right side of Export button to select export file format and name the export file:
You can also export a chat (all SMS, MMS and iMessages with someone) to a HTML file with photo, video attachments:
- 1.Backup your iPhone with iBackupBot or iTunes.
- 2.Select the backup in iBackupBot, navigate to User Information Manager, then switch to Messages tab in right side window.
- 3.Select the chat that you want to export, then click the Export button on toolbar of chat window and name the export HTML file:
Tags: iMessage, SMS
Posted in iPod to Computer Transfer, iTunes Backup Manager | Comments Off on Transfer SMS, MMS & iMessages from iPhone to Mac & PC
Thursday, November 21st, 2013
“I just bought my new iPhone 5s / iPad Air / iPad Mini Retina, how do I transfer SOME of my favorite App and its data files from my old device to the new device?”
With iBackupBot, it is very easy.
First, run Setting App on your new iPad or iPhone, tap iCloud and turn off Documents & Data option. If you need, you can turn it on again after data files transferred.
First Case: The old iPad / iPhone is NOT on your hand (sold or lost) but you had backup it on your computer, you can follow below article to install the Apps on your new iPad / iPhone:
Downloading past purchases from the iTunes Store, App Store, and iBooks Store
Then you can import Apps data files from the backup of the old device with iBackupBot:
- Run iBackupBot, connect your new iPad / iPhone to computer, then select it in left side window and select User Applications.
- Select the Apps that you want to transfer App data files in right side window, you can select multiple Apps (hold CTRL/SHIFT key and mouse click on Windows system or COMMAND/SHIFT key on Mac OSX system).
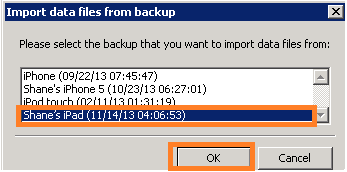
- Click the Import Data Files button on the toolbar, select the backup of your old iPad / iPhone from pop up window.
- Click OK button to start transfer.
Second Case: The old iPad / iPhone is on your hand, and the Apps you want haven’t installed on new iPad / iPhone, you can archive Apps and its data files from old iPad / iPhone, then install to new iPad / iPhone with iBackupBot:
- Run iBackupBot, connect your old iPad / iPhone to computer, then select it in left side window and select User Applications.
- Select the Apps that you want to transfer App and data files in right side window, you can select multiple Apps (hold CTRL/SHIFT key and mouse click on Windows system or COMMAND/SHIFT key on Mac OSX system).
- Click the Archive App button on the toolbar, then select an exist folder on your computer. iBackupBot will export the Apps and its data files to that folder.

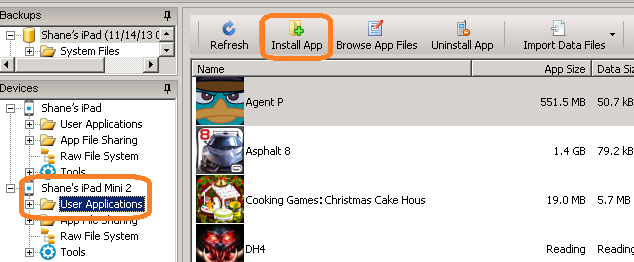
- Connect your new iPad / iPhone to computer, select it in left side window and select User Applications.
- Click Install App on toolbar of right side window, select the .ipa files that you just archived in previous step, you can select multiple .ipa files. iBackupBot will install Apps and its data files to your device.
Third Case: The old iPad / iPhone is on your hand, and the Apps you want already installed on your new iPad / iPhone, you just want import data files from old iPad / iPhone to new iPad / iPhone:
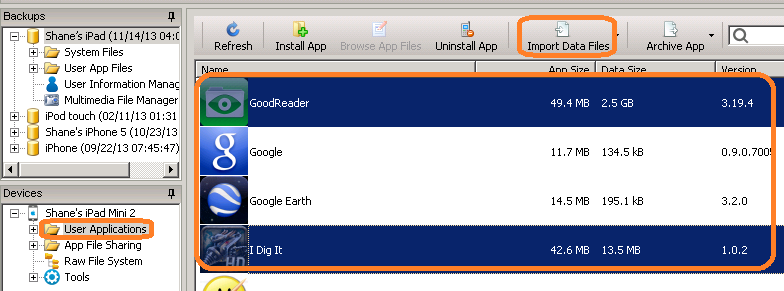
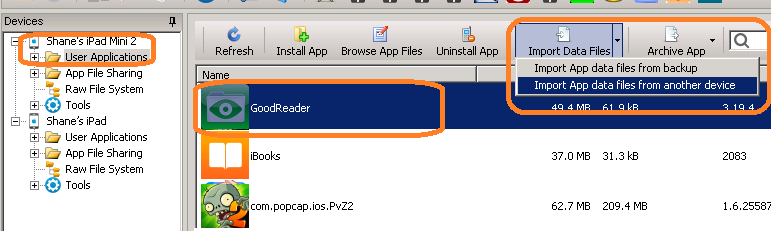
- Run iBackupBot, connect both of your old iPad / iPhone and new iPad / iPhone to computer, then select the new iPad / iPhone in left side window and select User Applications.
- Select the Apps that you want to transfer App and data files in right side window, you can select multiple Apps (hold CTRL/SHIFT key and mouse click on Windows system or COMMAND/SHIFT key on Mac OSX system).
- Click the drop-down button at the right side of Import Data Files button, then select Import data files from another device from pop up menu.
You can also right click mouse button on selected Apps (Windows system), or hold CTRL button and click mouse button (Mac OSX system), then select Import data files from another device from pop up menu.
Then iBackupBot will transfer data files of selected Apps from old iPad / iPhone to new iPad / iPhone automatically.
Tags: Transfer App Data Files
Posted in iTunes Backup Manager | Comments Off on Transfer App and App data files between iPad and iPhone
Tuesday, October 8th, 2013
From iBackupBot v5.0.5, the “Partial Restore” feature is compatible with iOS 7, so you can restore only SMS messages with attachments from iOS 6 backup to iOS 7 device directly, no need export/import files, as this article shows:
Transfer SMS history from one iPhone to another iPhone
Sometime the above method may not works (e.g the backup is incorrect, or your new iPhone use a new iTunes account other than the old iPhone) you can try below steps. And use above method, you will need re-enter email account password and iCloud password after restore from backup of other device. If you don’t like this, you can also try below steps.
Since iPhone 5s & iPhone 5c released, many use asked me:
How to transfer SMS, include iMessage from my old iPhone 4/iPhone 4s/iPhone 5 with iOS 6 to my new iPhone 5c/iPhone 5s with iOS 7? And I don’t want loose any attachments of my messages.
And also some use asked:
I don’t like iOS 7, how to transfer my SMS messages from iOS 7 device to an iOS 6 device?
With iBackupBot, you can transfer SMS messages include attachments between iOS 6 device and iOS 7 device with few steps:
First, please confirm you installed the latest version of iBackupBot from:
http://www.icopybot.com/download.htm
Then follow below steps:
- 1. Backup both of your old iPhone and new iPhone, you can do it with iBackupBot, or iTunes. Just connect your iPhone to computer and click “Backup Now” in iBackupBot or iTunes.
- 2. Export SMS message database file and the folder that contain attachments from backup of old iPhone to computer:
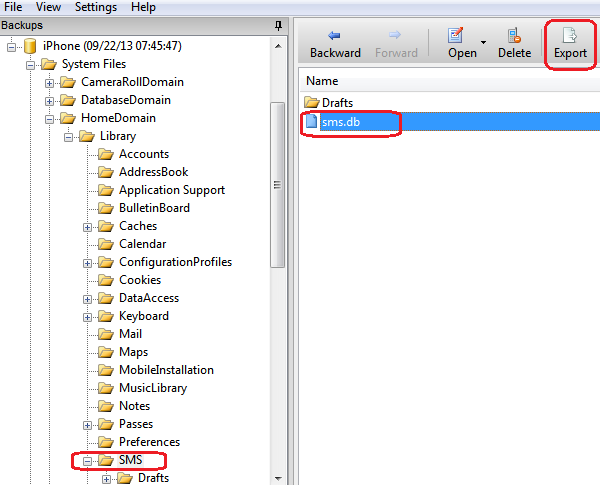
Select the backup of old iPhone, navigate to System Files -> HomeDomain -> Library -> SMS, then select sms.db in right side window and click Export button, then select a folder on your computer:
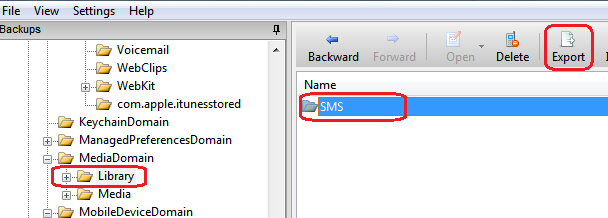
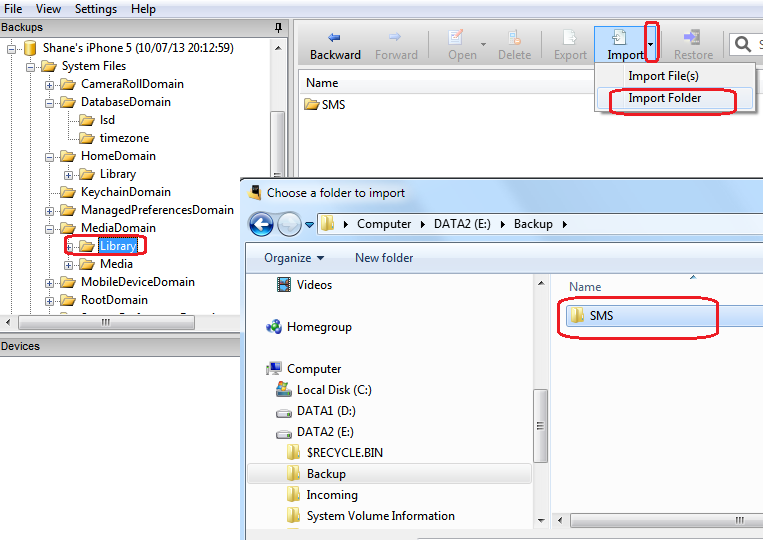
Then navigate to MediaDomain->Library, select SMS in right side window and click Export button, then select a folder on your computer:
- 3. Import SMS message database file and the folder that contain attachments from computer to backup of new iPhone:
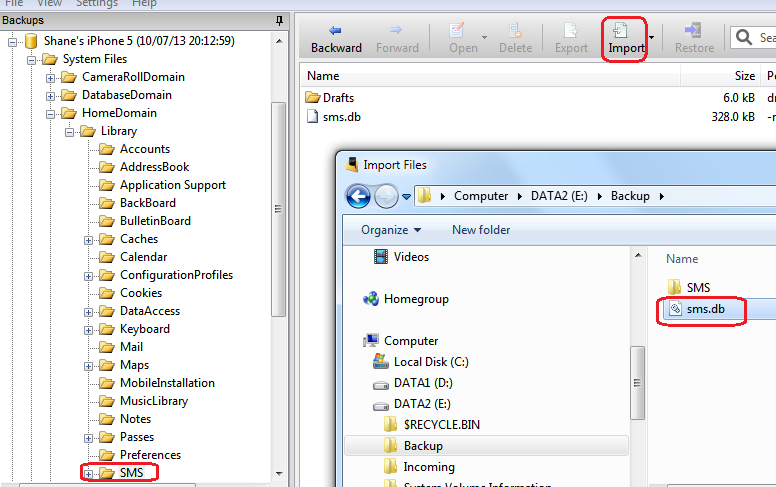
Select the backup of new iPhone, navigate to System Files -> HomeDomain -> Library -> SMS, then click Import button and select the sms.db that you just exported to computer:
Then navigate to MediaDomain->Library, then click drop down button on right side of Import, select Import Folder and select the SMS folder that you just exported to computer:
- 4. Restore the backup of new iPhone to device:
Before you restore SMS, please turn off Find My iPhone on your new iPhone, to turn off Find My iPhone on an iOS device, tap Settings > iCloud, then tap to turn off Find My iPhone.Then you can select File -> Restore from main menu or right click on the backup of new iPhone and select Restore to Device from pop up menu, and keep restore options as below and click OK button:
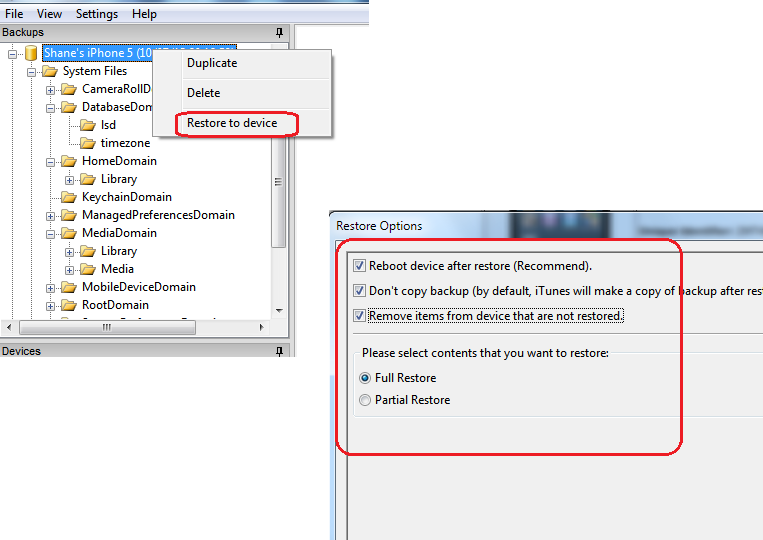
After the restore processing done, your iPhone will restart automatically, then you can see your SMS messages on your new iPhone.
Tags: Transfer SMS
Posted in iTunes Backup Manager | Comments Off on Transfer SMS messages with attachments between iOS 6 and iOS 7
Tuesday, September 24th, 2013
When restore a backup to iPad or iPhone with iOS 7 installed, iBackupBot may pop up a error message window show “Error occurred, error code: -37″, like this:
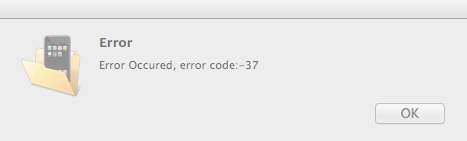
There are 2 cases can cause this problem:
Case 1. The most possible reason is that you enabled Find My iPhone on your iPad or iPhone, you can temporary disable it then try to restore again, and re-enable it after restore completed. To turn off Find My iPhone on an iOS device, tap Settings > iCloud, then tap to turn off Find My iPhone.
Case 2. Cause of some security software on your computer, please read this article from Apple for more detail:
iTunes Restore Error Code 37
If you try the method in case 1 and case 2 and the problem still not resolved, you can try restore your device with iTunes on a different known-good computer. If the errors persist on another computer, the device may need service, just take it to Apple Store.
Special Thanks to Don Hudson!
Tags: Restore Error
Posted in iTunes Backup Manager | Comments Off on Error code -37 when restore to iPad or iPhone with iBackupBot
|