plist Editor Pro User Manual
Getting StartedXML View/List ViewXML View will show plist file in XML text, you can edit plist file as regular text editor. List View will show plist file as property list, you can view it more clearly. Especially for those DATA properties, you can double click it in List View, the program will decode the data and show you in built-in Text Editor/Database Viewer/Image Viewer/Hex Editor/plist Editor according to its content, you can edit the data and saving changes.  You can toggle the mode by click the tab tag or by press CTRL+TAB key. Code folding Code folding implemented in XML View, you can enable/disable it in View menu by check/uncheck Show folding. When Code folding enabled, If a "+" or "-" is displayed in the folding gutter the folding state of the referenced code may be toggled by left-clicking on the folding symbol in the folding gutter. For example, in the following code:  clicking on the "+" would expand the collapsed code. Clicking on the "-" below: 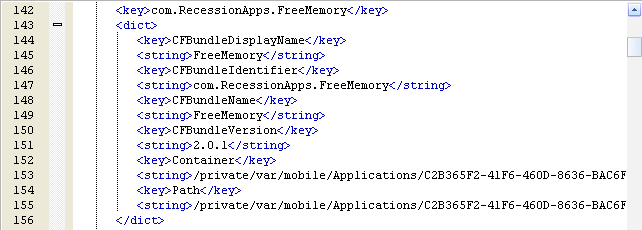 would collapse the expanded code. Cursor Movement The "up", "down", "right" and "left" arrows will move the cursor one character or line as indicated. Holding down the CTRL key while using the "left" or "right" cursor arrows will move the cursor left and right to the beginning of the previous/next word. Holding down the CTRL key while using the "up" or "down" keys does not affect the cursor position, but moves the text within the editor window up or down respectively. If the text is moved enough for the cursor to meet the upper or lower edge of the editor window the cursor will then move from line to line as it does when normally using the "up" and "down" arrows. The "Home" key moves the cursor to the beginning of the line the cursor is on. Holding down the CTRL key while using the "Home" key moves the cursor to the beginning of the document. The "End" key moves the cursor to the end of the line the cursor is on. Holding down the CTRL key while using the "End" key moves the cursor to the end of the document. The "Page Up" key moves the cursor up one page. Holding down the CTRL key while using the "Page Up" key moves the cursor to the top of the edit window. The "Page Down" key moves the cursor down one page. Holding down the CTRL key while using the "Page Down" key moves the cursor to the bottom of the edit window. Drag and Drop EditingXML View mode supports dragging and drop editing using the mouse. Drag and drop editing allows the user to select text in the normal manner and then copy or move the selected text by dragging it to a new location with the mouse. No keyboard interaction is required. Initially the user selects text in the normal manner. Once text has been selected, the user may click the primary mouse button (usually the left button) on the selected text, at which time the mouse pointer changes to a pointer with a small dotted rectangular box at the bottom of the pointer. This pointer indicates you are in the drag and drop editing mode and may drag the selection to a new location. While keeping the primary mouse button down the selected text may be dragged to a new location. As you move the mouse the cursor will follow the mouse and the cursor indicates the new position of the text if you stop pressing the mouse button (and "drop" the text). At any time, pressing ESCAPE will cancel the drag and drop mode. Additionally, instead of moving the text being dragged it may be copied to a new location. If at any time while in the drag and drop mode the CTRL key is pressed and held the mouse pointer changes to have a small '+' symbol beside it indicating the text will be copied to the new location indicated by the cursor and also remain in the original position. Text Selection/HighlightingHolding down the "Shift" key while cursoring with the arrows highlights the text the cursor passes showing that the highlighted text is selected for edit. Holding down the CTRL and the "Shift" key while using the left or right cursor arrows highlights one complete word at a time for editing, moving to the beginning of the previous/next word. Holding down the CTRL and the "Shift" key while using the "Home" key will highlight all text from the beginning cursor position to the beginning of the document being edited. Holding down the CTRL and the "Shift" key while using the "End" key will highlight all text from the beginning cursor position to the end of the document being edited. Insert/Overstrike ModesIn XML View allows editing in both insert and overstrike modes. The insert/overstrike mode is changed with the INSERT key. The mode is toggled when the INSERT key is pressed. You can also toggle the mode in View Menu by check/uncheck Overwrite mode. Insert mode causes a key to be inserted into the document at the position of the cursor. Overstrike mode causes the character immediately to the right of the cursor to be overwritten by the new character. Hex EditorWhen you double click a data property in List View, in most case the program will popup a Hex Editor, you can edit data in this Hex Editor and save changes to plist file. 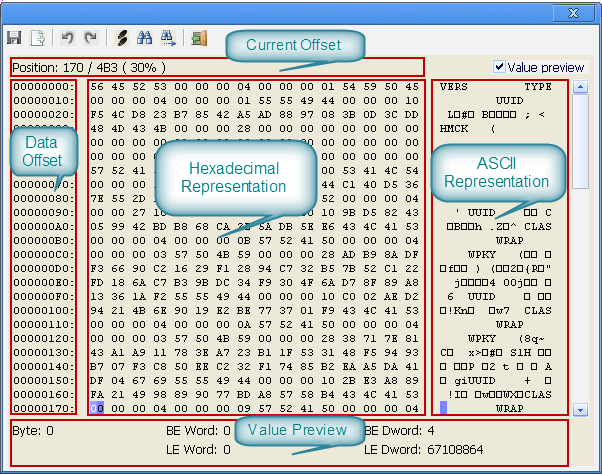 The Hex Editor window splite in five areas as shown: The current offset area shows the offset of current cursor. The data offset area shows the current byte offset of the character at the beginning of the line to form the beginning of the data. The hexadecimal representation shows the hexadecimal value of each data byte as a two character field separated from the next byte by a space (' '). The ASCII representation provides the view of printable characters. The value preview area shows the decimal value of byte/big endian word/little endian word/big endian double word/little endian double word in current cursor position. Editing in either the ASCII are or the HEX area automatically updates the other area after each valid character is typed. All modifications are performed in OVERSTRIKE mode. Menu CommandsFile MenuNew command:Use this command to create a new plist document in plist Editor Pro.(Shortcut:CTRL+N) Open command:Use this command to open an exist plist document in plist Editor Pro.(Shortcut:CTRL+O) Save command:Use this command to save the active plist document to its current name and directory. When you save a plist document for the first time, plist Editor Pro displays the Save As dialog so you can name your plist document. (Shortcut:CTRL+S) Save As command:Use this command to save and name the plist document. plist Editor Pro displays the Save As dialog so you can name your plist document. Print command:Use this command to print a plist document in XML text. This command presents a Print dialog, where you may specify the range of pages to be printed, the number of copies, the destination printer, and other printer setup options. (Shortcut:CTRL+P) Print Preview command:Use this command to display the plist document as it would appear when printed. When you choose this command, the main window will be replaced with a print preview window in which one or two pages will be displayed in their printed format. The print preview toolbar offers you options to view either one or two pages at a time; move back and forth through the document; zoom in and out of pages; and initiate a print job. Print Setup command:Use this command to select a printer and a printer connection. This command presents a Print Setup dialog, where you specify the printer and its connection. Edit MenuUndo command:Use this command to reverse the last editing action, if possible. Repeated Undo commands will attempt to step backwards through the previous commands and undo one at a time. (Shortcut:CTRL+Z) Redo command:The Redo command allows commands that have previously been undone with the Undo to be redone. (Shortcut:CTRL+Y) Cut command:Use this command to remove the currently selected data from the plist document and put it on the clipboard. This command is unavailable if there is no data currently selected. (Shortcut:CTRL+X) Copy command:Use this command to copy selected data onto the clipboard. This command is unavailable if there is no data currently selected. (Shortcut:CTRL+C) Paste command:Use this command to insert a copy of the clipboard contents at the insertion point. This command is unavailable if the clipboard is empty. (Shortcut:CTRL+P) Delete command:The delete command deletes the selected text or if no text is selected it deletes the character at the cursor. Selete All command:The Select All command highlights the complete file. This allows an easy mechanism to select the complete plist file and Cut it to the clipboard.(Shortcut:CTRL+A) Find command:This command displays a dialog box for searching the plist document for the specified text. (Shortcut:CTRL+F) Find Next command:This command repeats the previous Find command in the forward direction toward the end of the plist file. The next occurrence of the find text will be found (if present) in the forward direction. (Shortcut:F3) Replace command:This command displays a dialog box for searching the document for the specified text and replacing it with a different text. (Shortcut:CTRL+H) Toggle Bookmark command:Toggle "bookmark" of current line. Once a bookmark has been set at a line, you may use menu or keyboard commands to move to that line. Next Bookmark command:Move to the next bookmark after the insertion point. Previous Bookmark command:Move to the previous bookmark after the insertion point. View MenuShow line number command:Show/Hide line number in XML View. Show folding command:Show/Hide code folding in XML View. Show bookmarks command:Show/Hide bookmarks in XML View. Overwite mode command:Toggle overwrite/insert mode in XML View. Wrap mode command:Toggle wrap mode. In wrap mode, plist Editor Pro will automatically wrap words to the next line at the vertical edge of the active window. Read only command:Toggle readonly/change-able mode, in readonly mode, you can not modify the plist document. Skin command:Change skin of user interface. Download Free Trial
|
Copyright © 2002-2025 VOW Software, LLC. All rights reserved. Legal | Sitemap | About Us